Tuning Lever Design & Maintenance
by Keith Bowman, RPT
INTRODUCTION
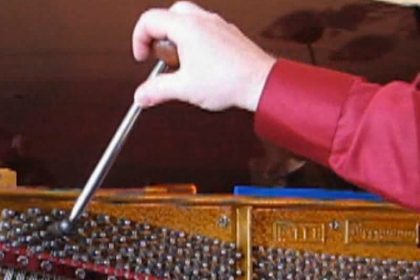
 The tuning lever or “hammer” is simply a specialized wrench that enables a piano technician to apply a torquing force sufficient to overcome tuning pin friction. But unlike most other technical professions, this tool bears the great burden of constant use. Therefore, it is important for each technician to develop his or her tool system. This includes choosing the right tuning lever(s) for individual preference and tuning technique, component choices for adapting to various plate/pin configurations, practicing some simple preventative maintenance and understanding repair options.
DESIGN CRITERIA
Tactility:
 Every experienced technician understands the importance of sensing pin movement in the tuning process. The tuning lever must be able to transfer this feedback into the hand. Tuning foremost is a tactile process, and developing sensitivity is the most difficult aspect of tuning to master.
Rigidity:
Maximum tactility and efficient tuning demand a rigid shaft. A shaft that deflects when force is applied becomes a spring, storing energy and releasing it late. This condition will cause pitch “overshoot” and pin manipulation in a wider degree of arc, wasting time, energy and compromising tuning stability. Shaft deflection is a common problem with extension style tuning levers, as the shaft is held only in the jaws of the collet which can actually provide a pivot point for movement. Shaft deflection increases with length, smaller diameters, or in tools where the shaft does not insert very far into the handle.
Balance:
Tool balance is more important than total tool weight. If you have a cordless drill, try this: Hold your drill roughly orizontal and gently rock it back and forth, observing how the muscles in your hand and forearm feel. Now, remove the battery pack and try it again. You will probably have the sensation of discomfort and more weight, even though weight was removed.
The tuning process dictates a change from that of pin manipulation to one of removal from the pin, repeated for each tuning pin in the piano. How much change in hand position (“choking up”), if any, is necessary to lift the lever off the tuning pin largely depends on the balance point of the lever. Within the limits of handle profiles, a balance or pivot point near the middle, or even closer to the back, provides some counter-balance and tends to reduce hand fatigue. Conversely, levers with more weight at the front will have a “negative” pivot point, tending to increase hand fatigue.
Grip and Hand Posture:
 A tool handle that is comfortable is an obvious criterion. But what makes a handle comfortable? The shape of the handle, the diameter(s) of the handle, and how or where it is gripped are all interrelated. Let’s consider handle diameters. In the hand, as well as most other parts of the body, tendons, muscles and bones work together as a Class III lever (like the catapult). Due to muscle contraction and some increase in leverage, more force or strength is available as the hand and fingers draw together. Try opening a large spring clamp. You may notice that initially it seems harder to squeeze because your hand has less strength when stretched open. If we grip a tool that is sized to allow full contraction of the hand, more strength is available, a lower percentage of strength is required to grasp the tool, and risk of fatigue is reduced. This advantage reaches its limit when the hand closes to the point of fingers interfering with the palm.
When looking at a traditional, straight handle, the tennis racquet sizing guideline seems to work, where the fingers wrapping around the handle should almost, but not quite, touch the palm. This averages about 1.25 inches for an average sized hand. If your hand is larger or smaller (or longer or shorter fingers) a 1/16 inch adjustment or more in diameter might be appropriate.
 Ergonomic handles – ball, oval or teardrop profiles, can’t be gauged this way, as there are too many variations in hand shape and in individual gripping posture. We start with generic diameters and move up or down accordingly. Experience has shown less risk of hand fatigue when erring slightly to the small side of an individual’s ideal. Various handle profiles all have their advantages.
Tool usage is extremely individualized, and it is common to see technicians with similar tuning techniques and service requirements using very different lever designs. One advantage of an ergonomic style like the ball is a “universal joint” grip, reducing excess wrist flexing. Another advantage of these styles is the larger radiuses and contact area which better distributes the pressure of tuning forces across greater surface area of the hand, reducing pressure on individual bones of the hand.
COMPONENTS
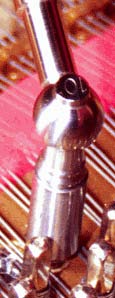
In order to apply a torque force to the tuning pin with appropriate mechanical advantage, the head simply provides a right angle from the axis of the tuning pin. However, due to piano design, the head component involves a great deal of compromise. The ideal head would be extremely short at a 90 degree angle to the pin axis, and would provide the highest efficiency in the application of torque. But plate obstructions prohibit this ideal in all piano designs. In order to clear these obstructions, a combination of adding length (height) and machining the shaft bore at greater than 90 degrees (0 degrees to normal) is used, usually between 5 and 15 degrees.
It is desirable to use a combination of length and angle that satisfies the plate clearance problem without excesses in either criterion. With a short head/high angle, force is not applied at 90 degrees to pin rotation, creating a vector. This means that while most of the force is turning the pin, some of the force is flexing the tuning pin and the lever, lessening tuning efficiency.
With a long head/low angle, vector forces may theoretically be reduced, but such a tall configuration will tend to lean, in part from flexing and additionally from a less than perfect fit of the tuning tip and tuning pin. When tuning force is applied, the configuration (including the tuning pin) deflects, creating the same tactility problems as shaft deflection.
Logic might suggest that a medium length and medium angle is the best compromise. However, through experience, technicians determine their preference, which reaches into both extremes. Another point to consider is that the extra weight of long heads adds more negative balance to the lever.
Our recommendation is to have two or more head selections available, using the shortest, or lowest angle on pianos with minimum plate obstructions, and changing to a longer or higher angle only when necessary. More on that later.
Tips
This component is the drive socket that mates with the swaged portion of the tuning pin. The pin is swaged square and also tapered, the included angle being roughly 8 degrees. The best match between tip and tuning pin should:
1. Seat as close to the coil as possible, without touching the coil.
2. Seat securely on the pin without rocking motion.
While the common, 8-point star tip is available in four sizes to accommodate comparable sizes of tuning pins, there are several problems that can interfere with an ideal fit.
1. Tuning pin swaging is not a precise machining operation. Since a taper involves a major and minor diameter, variations in either can affect the angle.
2. In some cases, the swaging process forms a ridge or burr at the edge of each flat, having the effect of larger diameters or altering the taper angle. This burr can prevent proper seating and sometimes make tool removal
troublesome.
3. Due to generous manufacturing tolerances, the female profile of the star tip, also being tapered, can vary in major and minor diameters. Any small variations of either the tip socket or the tuning pin will cause mis-matched angles and cause a rocking motion.
4. Also due to loose tolerances, tip sizes are not uniform. With the same tuning pin as a gauge, variations in seating height can be found both within the same tip size and between tip sizes – especially so between different batches or manufacturers.
5. On occasion, the 8-point star profile is not symmetrical. This can cause inconsistent rocking depending on which four points of the tip contact the tuning pin. It is often necessary to invest in several tips, in each size, in order to achieve the best possible pin seating. If there is an obvious problem with a new tip, return it.
One exception to the above seating criteria is a tuning technique used by some technicians which calls for a “slop” fit between tip and pin. By having some play (and slight arc of movement) a micro-impact is imparted for pin manipulation.
Experienced technicians that employ this technique get good results but we do not recommend it for beginners. In addition, wear to the tip is accelerated, and in cases of high tuning frequency, the tuning pins can wear or develop burrs.
In addition to sizes, special tips are available:
Thin wall tips – 1/2 inch outside diameter for temporary use where a small section of tuning pins are crowded together, or where a tuning pin is too close to a plate strut. These tips are not as strong as regular tips and should only be used where necessary. They are available in the #2 standard shape, which can be threaded either on to a ead or an adapter tip. They are also available as an extension style, with a tapered square end that fits into star tip already attached to your lever.
Extra long tip – a 2 1/2 inch length (#2 only) . Using this tip with shorter heads can solve clearance problems and provide higher angles not found on long heads. (not recommended).
Oblong tips – For the smithed or swaged pins found in “square” pianos; a necessity if you service these instruments. Usually used with long heads due to special clearance problems.
Note: Very early instruments may require the use of an oblong-tip harpsichord wrench or special machining if the original tool is lost.
One piece head/tips – Major supply houses offer unitized components. These limit configuration choices to predetermined star tip size, and head length and bore angle. In addition, wear or damage to any portion of the component requires disposal of the entire unit, not just the tip or the head. Unitized head/tips found on inexpensive levers often do not seat well on the pin.
DEVELOPING A COMPONENT SYSTEM:
Since the shaft/head threading is hand tightened, but the head/tip threading is press or “compression” tightened with a tip wrench and great amount of torque, much time and wear is saved by marrying the head and tip that satisfies each tuning requirement that you encounter. Neither the cost or space in the tool case is prohibitive, so several configurations are effective. Depending on your service requirements, you may consider two or three tip sizes each attached to one or more heads. This will provide the best tuning pin fit and plate clearance with a rapid change-over when needed.
Tightening tips: The easiest way to attach your tips is in the comfort of your own shop (or garage). Carefully and firmly clamp the tip wrench in a bench vise. With the head firmly attached to the lever, thread the tip hand-tight, or spin the lever and head unto the tip with the tip inserted in the wrench. Now, grasping the lever and using most or all of your strength, finish the tightening process. Unless your bench is heavy it may be necessary for someone to brace against the opposite side. Be careful that the wrench does not slip out of the vise; injury or damage could occur.
MAINTENANCE AND REPAIR OPTIONS:
THREADING PROBLEMS:
One of the most common problems is between the shaft and head. In the American system, this thread fit is based on the National Pipe Taper (1/8 – 27 NPT), meaning that both the male and female threads have matching tapers based on 3/4 inch per foot. In the ideal fit, the matching threads wedge tight with even pressure along the entire thread contact area. Threads compress slightly and are resistant to loosening. Technicians experience problems both with thread mating and with the amount of shaft projection into the head:
1. Threads – On a nut and bolt, looseness and tightness are obvious conditions. Tapered threads are more subtle. If for any reason the taper wedges tight favoring either the small or the large diameter, the fit will seem tight but only a few threads will be in compressed contact. In the head, the last couple of threads at the bottom of the bore are only partially cut. If the shaft thread compresses into these partial threads, it will seem tight but will only be supported by a couple of threads. In either condition, some flexing will occur, diminishing the rigidity of the tool with the eventual result of thread damage. Further, this condition of fit will more easily loosen. If the lever is used with an even slightly loose head fit, cross-stripping may occur. A common symptom is a “stuck” head that cannot be fully tightened but cannot be unscrewed for removal without complete thread damage.
2. Projection – Projection refers to the depth that the shaft threads into the head, whether shallow or deep. While the taper angle and thread pitch are generally uniform, projection varies greatly and becomes a compatibility problem. If the shaft thread has larger major and minor taper diameters, the threads will engage the head after only a few turns. Conversely, if the shaft thread has relatively smaller taper diameters, the shaft could bottom out in the head before the threads compress tight, or, the shaft might want to go deeper than its own threading allows, binding at the surface of the head. Either condition can potentially cause thread damage, as noted above.
The thread connection of the head and tip (25/64 – 30) is usually not a problem. If one or both components are very old, they should be periodically inspected for chipped threads or other damage. If connecting new components, often there is residual, hardened cutting fluid on the threads. Occasionally, there may be some tiny crumb-like chips from the tapping operation. If you hear any tiny crunching noise when attaching the head to the shaft or the tip to the head, unscrew and clean the threads. WD-40 or similar product will soften dried tapping fluid residue and rinse out any particles.
EXTENSION STYLE LEVERS:
This feature, which is traditional, allows tool length to adjust by means of a collet (tightening sleeve) and compression nut. When this knurled nut is tightened, it draws the collet closed, which clamps the shaft tight like vise jaws. Shaft profiles include round; round with a milled groove; hexangular. The success of this design depends on how carefully matched the collet, nut and shaft are to each other. The most typical problems are collet related. The shaft will slip, causing frequent re-tightening of the nut, and in the case of non-grooved round shafts, may rotate as they slip. The extension feature is designed to be hand-tightened, not wrench tightened.
1. Slippage problems – to determine which component may be at fault, try the following test: Tighten the compression nut with pliers (first wrap a piece of leather around to protect the knurled surface).
A . If the shaft tightens adequately, the problem is with the nut’s ability to compress the collet closed, whether the collet jaws need to be over-compressed or that the internal taper of the nut doesn’t precisely or uniformly match the external taper of the collet. The collet sleeve usually has four slots, creating four jaws. If inspection shows that the jaws might contact each other before complete compression occurs, it may be possible to relieve the slots by filing or sanding. Otherwise, the problem might be non-correctable without shaft replacement.
B . If the shaft still slips, then it of too small a diameter to work with the collet, even if only by a couple thousands of an inch. If a replacement shaft is available, it might be just enough larger diameter to work better. Measure your shaft with a micrometer. A supply house might be willing to mic their replacement shaft to confirm its suitability.
C . Sometimes, due to handling, scratches or burrs can form on the shaft, creating non-uniform tightening. Hex shafts can receive dents on their corners.
Carefully file or sand any irregularities.
If for any reason shaft slippage cannot be corrected or if cost-prohibitive, replace the tool. If purchasing a new extension style lever, inspect the tightening feature carefully. If it does not lock the shaft in position with reasonable hand strength, return it to the seller. Incidentally, the universal handles for regulating tools work the same way, collet tightened, and frequently have the same problem. The prime reason in both cases is that the components are not machined to the precise tolerances necessary for proper function.
MAINTENANCE:
A. Wear – Depending on tuning frequency and tuning technique, components and even the entire lever will need replaced at some interval. Make a habit of inspecting your lever frequently. Check the tightness of the shaft/head connection to be sure you are not tuning with a loose head. Do not continue using the tool if the head will not readily unscrew – make a suitable repair or replace the offending component. If you detect a crack in the tip, replace it immediately. Wear safety glasses when removing in case a shard would fly off.
B. Corrosion – Prevent rust from forming by cleaning any tarnish that develops. Disassemble components if necessary. Steel wool, extra fine emery cloth or silicon carbide paper, or Sand Flex polishing blocks are all effective. Threaded portions can be cleaned on a fine wire wheel. Apply a small amount of machine oil or WD-40, wipe clean. The star socket can occasionally be cleaned with WD-40 to remove gunk buildup. Spray, wipe out and remove the excess with a swab. Any residual lubricant will not be a problem with tuning pins. If you just tuned a piano with rusty pins, clean the star socket as soon as possible.
C. Component fit – In an effort to keep all components tight to one another, galling or seizing can occur under some conditions, especially stainless to stainless connections. An anti-seize compound (automotive or plumbing supply) can be applied to one thread surface; tighten securely and wipe off the excess. If the tip becomes loose, then it must be re-attached with greater torque. No glues or compounds are appropriate. Make sure both mating surfaces are completely clean and free of any residue. Use a solvent and steel wool, or carefully scrape if needed. However, do not sand as it is too easy to knock the corners off, reducing the contact area of the fit.
If the shaft constantly becomes loose from the head, thread compatibility or damage must be investigated. However, under some circumstances the joint tightness can be helped with a lock-tight compound (hardware, automotive). Use a reversible, not permanent, type, applying a small amount to the male thread and screwing tight. Wait for the recommended time before using the lever. Do not use if you change heads as a matter of tuning procedure.
REPAIR:
A. Thread Repair – Female threads aren’t easily repairable and it is more cost-effective to replace a problem head or tip. Minor damage to male threads, especially the shaft threading, may be repairable.
1. Thread files, available in National Fine, Coarse, or metric, each have 8 thread pitches. They are handy for general shop work, and the 27 pitch will help clean up any bruising or corrosion on the shaft thread.
2. Rethreading tool, more costly, will adjust to any thread pitch and is the only tool, except a special order die, that will re-thread the male thread of the head component (30 pitch).
3. Re-threading die, available for the 1/8 – 27 NPT shaft thread, has a hexagon body that can be used with a wrench or clamped in a vise. It is actually more effective at repairing thread damage but won’t work unless it is started properly – otherwise, cross threading will occur. Be sure to use a tapping fluid, or a machine oil, for lubrication.
Note: Machine threads are expressed as a percentage of the theoretical full thread profile. 75% is typical. Repairing threads will remove some material thus lowering the percentage. Some material reduction is acceptable and still provides adequate strength to the joint.
B. Handle Repair – Wood or plastic handles
1. Handle loose from the shaft or collet: Attempt to remove the shaft or collet from the handle. Apply epoxy for plastic handles; epoxy or CA glue for wood handles; reinsert. Make sure no air is trapped that will try to push the shaft out – try light clamping pressure. If the shaft or collet cannot be removed without risk of cosmetic damage, try wicking thin CA glue into the joint. Mask off surrounding areas and apply very carefully.
2. Cosmetic Repairs – wood handles
a. Cracks, deep scratches or dents: If necessary, mask off. Use thin CA glue or a mixture of thin and medium CA glue; apply micro-drops with a toothpick. For cracks, repeat application until no more glue wicks in. For a scratch or dent, apply just enough glue to make a mound without glue spreading beyond the area of damage. Set aside and check later for the need of reapplication. Do not use accelerator. When hard, carefully scrape off high areas, or sand with a tiny paddle using 400 grit silicon carbide paper; buff out with steel wool or buffing wheel. If necessary, spot finish then buff out.
b. Worn finish, scuffs and shallow scratches or dents – Best to refinish the handle. Using a freshly sharpened scraper, carefully scrape off the finish. Follow with one or more grades of extra-fine sandpaper and steel wool. In some cases it may be possible to chuck the lever in a drill press (mask off the shaft to protect from chuck jaws) for the sanding operation. Mask off any metal portions of the lever and apply lacquer or the finish of your choice.
c. Machining Services: Depending on where you live, you may find a local machinist who is willing to do a small job, such as re-threading a shank. Larger shops often are not interested or have a prohibitively high minimum labor charge. Most technicians find the need for some kind of machining occasionally, and it is helpful to establish a relationship with someone interested in tackling small unusual jobs. Check Yellow Pages for an individual, not a firm or company.
SUMMARY:
The human body is highly adaptable. Someone once said that a competent technician should be able to tune a piano with visegrip pliers in an emergency. But we do have to consider minimizing tool and component wear, tuning pin wear, and stresses to our bodies throughout a career of piano service. While we do adjust to the tuning levers that we own and perhaps have been using for years, there is always the possibility of improving our tuning system by selecting one or more levers that better satisfy the criteria covered here, and maintaining them accordingly.
FUTURE:
Look for technical info on impact tuning lever design, function and maintenance.
Copyright © 2000 Lloyd Meyer & Company
 admin note: Renner actions are worldwide recognized as the best piano actions.
